
About Moonshot AI
Moonshot AI is a Beijing-based AI platform offering the Kimi large language model API, with the flagship Kimi K2 being a state-of-the-art Mixture-of-Experts (MoE) model featuring 1 trillion total parameters and 32 billion activated parameters per query.
Key features include an exceptional 256,000-token context window (the longest available for processing extended documents and conversations), strong coding and STEM performance competitive with GPT-4.1, native tool calling and function integration for agentic workflows, and stable large-scale training using the novel MuonClip optimizer on 15.5 trillion tokens.
The platform provides OpenAI-compatible API access through the Kimi Open Platform with variants including Kimi-K2-Base (for fine-tuning) and Kimi-K2-Instruct (optimized for chat and autonomous tasks), supporting advanced multi-turn interactions, reasoning, research, and software development applications.
Step by step guide to use MoonshotAI API Key to chat with AI
1. Get Your MoonshotAI API Key
First, you'll need to obtain an API key from MoonshotAI. This key allows you to access their AI models directly and pay only for what you use.
- Visit MoonshotAI's API console
- Sign up or log in to your account
- Navigate to the API keys section
- Generate a new API key (copy it immediately as some providers only show it once)
- Save your API key in a secure password manager or encrypted note
2. Connect Your MoonshotAI API Key on TypingMind
Once you have your MoonshotAI API key, connecting it to TypingMind to chat with AI is straightforward:
- Open TypingMind in your browser
- Click the "Settings" icon (gear symbol)
- Navigate to "Models" section
- Click "Add Custom Model"
- Fill in the model information:Name:
kimi-latest-8k via MoonshotAI(or your preferred name)Endpoint:https://api.moonshot.ai/v1/chat/completionsModel ID:kimi-latest-8kfor example (check MoonshotAI model list)Context Length: Enter the model's context window (e.g., 32000 for kimi-latest-8k)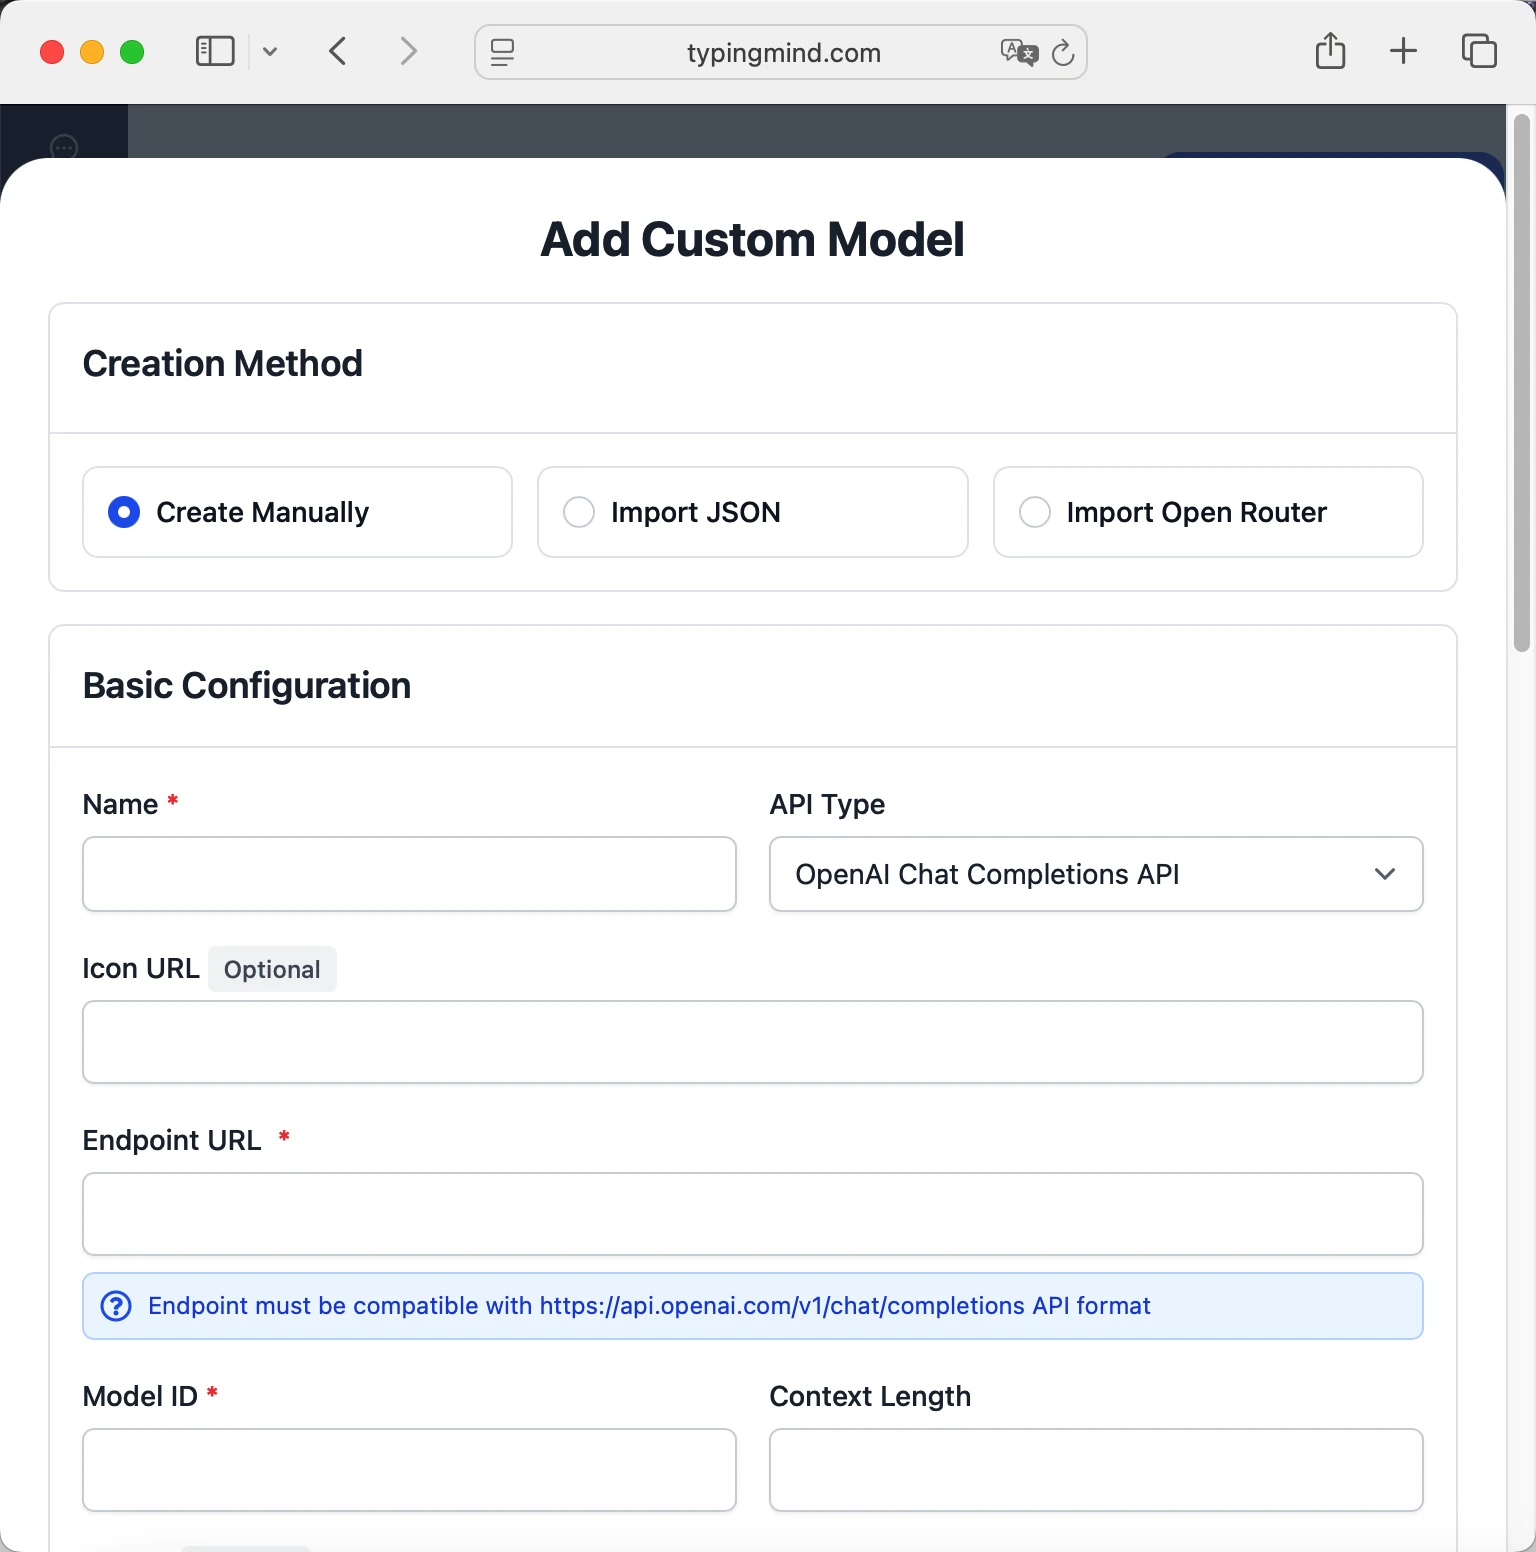 kimi-latest-8khttps://api.moonshot.ai/v1/chat/completionskimi-latest-8k via MoonshotAIhttps://www.typingmind.com/model-logo.webp32000
 - Add custom headers by clicking "Add Custom Headers" in the Advanced Settings section:Authorization:
Bearer <MOONSHOT_API_KEY>:X-Title:typingmind.comHTTP-Referer:https://www.typingmind.com - Enable "Support Plugins (via OpenAI Functions)" if the model supports the "functions" or "tool_calls" parameter, or enable "Support OpenAI Vision" if the model supports vision.
- Click "Test" to verify the configuration
- If you see "Nice, the endpoint is working!", click "Add Model"
3. Start Chatting with MoonshotAI models
Now you can start chatting with Moonshot AI models through TypingMind:
- Select your preferred MoonshotAI model from the model dropdown menu
- Start typing your message in the chat input
- Enjoy faster responses and better features than the official interface
- Switch between different AI models as needed
- Use specific, detailed prompts for better responses (How to use Prompt Library)
- Create AI agents with custom instructions for repeated tasks (How to create AI Agents)
- Use plugins to extend MoonshotAI capabilities (How to use plugins)
- Upload documents and images directly to chat for AI analysis and discussion (Chat with documents)
4. Monitor Your AI Usage and Costs
One of the biggest advantages of using API keys with TypingMind is cost transparency and control. Unlike fixed subscriptions, you pay only for what you actually use. Visit https://platform.moonshot.ai/console/limits to monitor your MoonshotAI API usage and set spending limits.
- Use less expensive models for simple tasks
- Keep prompts concise but specific to reduce token usage
- Use TypingMind's prompt caching to reduce repeat costs (How to enable prompt caching)
- Using RAG (retrieval-augmented generation) for large documents to reduce repeat costs (How to use RAG)

Access OpenAI: ChatGPT-4o via OpenRouter
OpenAI ChatGPT 4o is continually updated by OpenAI to point to the current version of GPT-4o used by ChatGPT. It therefore differs slightly from the API version of [GPT-4o](/models/openai/gpt-4o) in that it has additional RLHF. It is intended for research and evaluation. OpenAI notes that this model is not suited for production use-cases as it may be removed or redirected to another model in the future.

Access Sao10K: Llama 3 8B Lunaris via OpenRouter
Lunaris 8B is a versatile generalist and roleplaying model based on Llama 3. It's a strategic merge of multiple models, designed to balance creativity with improved logic and general knowledge....

Access OpenAI: GPT-4o (2024-08-06) via OpenRouter
The 2024-08-06 version of GPT-4o offers improved performance in structured outputs, with the ability to supply a JSON schema in the respone_format. Read more [here](https://openai.com/index/introducing-structured-outputs-in-the-api/). GPT-4o ("o" for "omni") is...

Access Meta: Llama 3.1 405B (base) via OpenRouter
Meta's latest class of model (Llama 3.1) launched with a variety of sizes & flavors. This is the base 405B pre-trained version. It has demonstrated strong performance compared to leading closed-source models in human evaluations. To read more about the model release, [click here](https://ai.meta.com/blog/meta-llama-3/). Usage of this model is subject to [Meta's Acceptable Use Policy](https://llama.meta.com/llama3/use-policy/).

Access Meta: Llama 3.1 8B Instruct via OpenRouter
Meta's latest class of model (Llama 3.1) launched with a variety of sizes & flavors. This 8B instruct-tuned version is fast and efficient. It has demonstrated strong performance compared to...

Access Meta: Llama 3.1 405B Instruct (free) via OpenRouter
The highly anticipated 400B class of Llama3 is here! Clocking in at 128k context with impressive eval scores, the Meta AI team continues to push the frontier of open-source LLMs. Meta's latest class of model (Llama 3.1) launched with a variety of sizes & flavors. This 405B instruct-tuned version is optimized for high quality dialogue usecases. It has demonstrated strong performance compared to leading closed-source models including GPT-4o and Claude 3.5 Sonnet in evaluations. To read more about the model release, [click here](https://ai.meta.com/blog/meta-llama-3-1/). Usage of this model is subject to [Meta's Acceptable Use Policy](https://llama.meta.com/llama3/use-policy/).

Access Meta: Llama 3.1 405B Instruct via OpenRouter
The highly anticipated 400B class of Llama3 is here! Clocking in at 128k context with impressive eval scores, the Meta AI team continues to push the frontier of open-source LLMs. Meta's latest class of model (Llama 3.1) launched with a variety of sizes & flavors. This 405B instruct-tuned version is optimized for high quality dialogue usecases. It has demonstrated strong performance compared to leading closed-source models including GPT-4o and Claude 3.5 Sonnet in evaluations. To read more about the model release, [click here](https://ai.meta.com/blog/meta-llama-3-1/). Usage of this model is subject to [Meta's Acceptable Use Policy](https://llama.meta.com/llama3/use-policy/).

Access Meta: Llama 3.1 70B Instruct via OpenRouter
Meta's latest class of model (Llama 3.1) launched with a variety of sizes & flavors. This 70B instruct-tuned version is optimized for high quality dialogue usecases. It has demonstrated strong...

Access Mistral: Mistral Nemo via OpenRouter
A 12B parameter model with a 128k token context length built by Mistral in collaboration with NVIDIA. The model is multilingual, supporting English, French, German, Spanish, Italian, Portuguese, Chinese, Japanese,...
Access OpenAI: GPT-4o-mini (2024-07-18) via OpenRouter
GPT-4o mini is OpenAI's newest model after [GPT-4 Omni](/models/openai/gpt-4o), supporting both text and image inputs with text outputs. As their most advanced small model, it is many multiples more affordable...

Access OpenAI: GPT-4o-mini via OpenRouter
GPT-4o mini is OpenAI's newest model after [GPT-4 Omni](/models/openai/gpt-4o), supporting both text and image inputs with text outputs. As their most advanced small model, it is many multiples more affordable...
Access Google: Gemma 2 27B via OpenRouter
Gemma 2 27B by Google is an open model built from the same research and technology used to create the [Gemini models](/models?q=gemini). Gemma models are well-suited for a variety of...
