xtquantai logo

xtquantai

Community
dfkai

迅投 QMT 量化 AI 技能集(Agent Skills):研报因子回测脚本生成等,适用于 Claude Code / Cursor / Codex / Kimi 等 70+ AI 编程工具

Publisherdfkai
Repositoryxtquantai
LanguagePython
Forks
40
Stars
163
Available tools
0
Transport typestdio, streamable-http
Categories
LicenseMIT
Links
  • Connect tools to AI workflows

    xtquantai exposes MCP capabilities that can be used by compatible AI clients and agents.

  • 0 available tools

    Browse the callable actions below, including names and descriptions when provided by the server.

  • Ready-to-copy setup

    Use the installation snippets to configure this server in your preferred MCP client.

  • Open source signals

    163 stars and 40 forks from the linked repository.

xtquantai — 迅投 QMT 量化 AI 技能集

面向迅投 QMT / 投研终端的 Agent Skills 仓库:把量化策略开发的领域知识(因子回测、信号生成、实盘模板等)封装为标准 SKILL.md 技能,安装后可在 Claude Code、Cursor、Codex、Gemini CLI、Kimi Code 等 70+ AI 编程工具中直接使用。

validate License

本仓库曾是 xtquant 的 MCP 服务器实现,现已全面转型为 skill 仓库。旧 MCP 代码保留在 legacy-mcp 分支(tag v0.1.0-mcp),不再维护。

技能列表

技能状态说明
qmt-inner-backtest✅ 可用根据策略描述 / 研报 PDF / 截图解读因子逻辑,基于母版脚本生成 QMT 内置日频截面因子回测策略(after_init 预计算信号 → handlebar 调仓执行,含 Barra 风格因子处理与防未来函数检查)
qmt-future-trade🚧 规划中期货开平仓策略
qmt-live-strategy-template🚧 规划中目标持仓型实盘策略模板
qmt-live-signal-feishu🚧 规划中信号生成 + 飞书推送

参与社区

这个项目靠社区需求驱动——你在 QMT 量化中遇到的重复劳动,都可能值得做成一个技能:

所有技能在 CI 中自动按 Agent Skills 标准 校验。维护流程公开在 维护手册。

安装

方式一:npx skills(推荐,覆盖 70+ 工具)

bash
# 交互式选择要安装到的工具
npx skills add dfkai/xtquantai

# 只装某个技能
npx skills add dfkai/xtquantai --skill qmt-inner-backtest

# 装到全局目录(所有项目可用)
npx skills add dfkai/xtquantai -g

方式二:Claude Code 原生插件

text
/plugin marketplace add dfkai/xtquantai
/plugin install qmt-skills@xtquantai

方式三:Kimi Code CLI

text
/plugins install https://github.com/dfkai/xtquantai

方式四:让你的 Agent 自己装

对任意 AI 编程工具说:

读取 https://raw.githubusercontent.com/dfkai/xtquantai/master/INSTALL.md 并按其中说明安装技能。

方式五:手动复制

把 skills/<技能名>/ 整个文件夹复制到你所用工具的技能目录:

工具项目级目录用户级目录
Claude Code.claude/skills/~/.claude/skills/
Cursor (≥2.4).cursor/skills/(也读 .agents/、.claude/)~/.cursor/skills/
OpenAI Codex CLI.agents/skills/~/.agents/skills/
GitHub Copilot.github/skills/(也读 .claude/、.agents/)—
Gemini CLI.gemini/skills/ 或 .agents/skills/—
Kimi Code CLI.kimi-code/skills/ 或 .agents/skills/—
Windsurf.windsurf/skills/ 或 .agents/skills/—
OpenCode.opencode/skills/、.claude/skills/、.agents/skills/—
Cline (≥3.48).cline/skills/ 或 .claude/skills/(需启用实验特性)—
字节 Trae仅 .trae/skills/—
Qwen Code仅 .qwen/skills/—
iFlow CLI仅 .iflow/skills/—

跨工具通用目录是 .agents/skills/;只用 Claude 系工具可以放 .claude/skills/。

使用示例

安装 qmt-inner-backtest 后,在你的 AI 工具中直接说:

这份研报(附 PDF/截图)的上下影线因子,帮我生成一个中证1000、Top 10 持仓、5 日调仓的 QMT 回测脚本。

Agent 会先输出策略规格表供你确认,再基于母版生成完整的 QMT 策略编辑器回测脚本,并提示你需要在 QMT 面板中手动核对的配置项。

⚠️ QMT / 投研终端仅支持 Windows,生成的策略脚本需在 Windows 上的 QMT 策略编辑器中运行;skill 本身(生成脚本的过程)不限平台。

仓库结构

xtquantai/
├── skills/                       # 技能目录(每个子目录一个 skill)
│   └── qmt-inner-backtest/
│       ├── SKILL.md              # 技能定义(agentskills.io 标准格式)
│       └── scripts/
│           └── daily-factors-backtest.py   # 回测母版脚本
├── .claude-plugin/
│   └── marketplace.json          # Claude Code 插件市场清单
├── .github/                      # issue/PR 模板与 CI 校验
├── kimi.plugin.json              # Kimi Code 插件清单
├── INSTALL.md                    # 给 agent 读的安装指令
├── CONTRIBUTING.md               # 贡献指南
└── docs/                         # 调研文档与维护手册

许可证

MIT — 详见 LICENSE。

致谢

Installation

TypingMind
{
  "mcpServers": {
    "xtquantai": {
      "command": "xtquantai",
      "args": []
    }
  }
}

Use xtquantai MCP with multiple AI models

TypingMind connects MCP tools at the workspace level, so once xtquantai is connected, you can use it with different AI models in TypingMind instead of setting it up separately for each model. You can run MCP locally on your device or connect to a remote MCP server URL.

Option 1: Use the local connector

Use this when the MCP server needs access to local files, apps, or private resources on your computer.

1

Open the MCP settings

In TypingMind, go to Settings, Advanced Settings, then Model Context Protocol and choose Setup Connector.

  1. Open TypingMind in your browser.
  2. Click the Settings icon.
  3. Go to Advanced Settings.
  4. Open the Model Context Protocol section.
  5. Click Setup Connector and choose This Device.
TypingMind MCP connector setup screen with This Device selected
2

Run the connector command

Choose This Device, copy the command from TypingMind, and run it in Terminal. Keep the process running while you use MCP.

  1. Copy the setup command shown by TypingMind.
  2. Open Terminal on macOS or Windows Terminal on Windows.
  3. Paste and run the command.
  4. Approve the package install if Terminal asks you to proceed.
  5. Keep the Terminal window running while using MCP tools.
3

Add xtquantai as a server

When the connector status is Ready, click Edit Servers and paste the MCP server configuration.

  1. Wait until the connector status shows Ready.
  2. Click Edit Servers.
  3. Paste the xtquantai MCP server configuration.
  4. Save the server list.
  5. Refresh if you want to confirm the connector is still ready.
TypingMind MCP settings showing active server and Edit Servers button
{
  "mcpServers": {
    "xtquantai": {
      "command": "npx",
      "args": [
        "-y",
        "<mcp-server-package>"
      ]
    }
  }
}
4

Use it across models

Save the server list, open Plugins, enable the xtquantai MCP tools, then select any supported AI model in TypingMind and use the tools in chat or assign them to an AI agent.

  1. Open the Plugins page in TypingMind.
  2. Enable the xtquantai MCP tools.
  3. Start a chat and choose the AI model you want to use.
  4. Use the MCP tools in chat or assign them to an AI agent.
  5. Switch to another AI model whenever needed without reconnecting MCP.
TypingMind chat using enabled MCP tools with a selected AI model
Can you use xtquantai to help me with this task?
xtquantai
Sure. I read it.
Here is what I found using xtquantai.

Option 2: Add an MCP server URL

Use this when xtquantai is already hosted remotely or your team wants one shared connector that multiple users can access.

1

Open MCP connectors

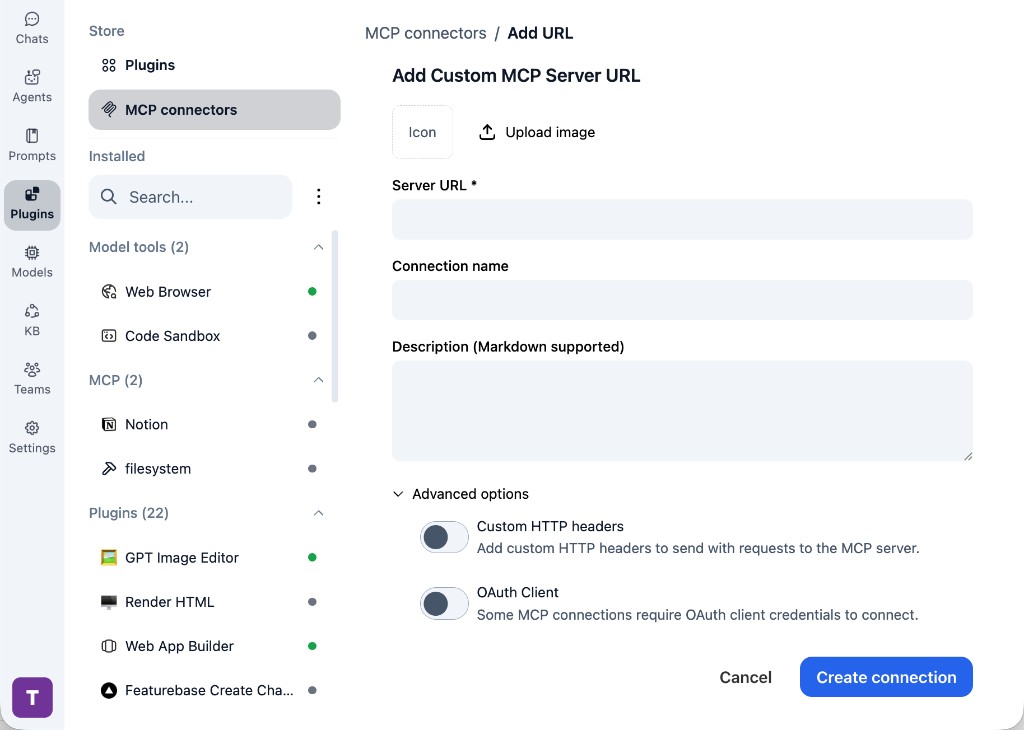
In TypingMind, go to Plugins, open MCP connectors, then choose Add URL.

  1. Open TypingMind in your browser.
  2. Go to Plugins.
  3. Open MCP connectors.
  4. Click Add URL.
TypingMind Add Custom MCP Server URL form
2

Paste the server URL

Enter the MCP server URL from the provider in the Server URL field. Add a connection name, description, icon, custom HTTP headers, or OAuth client settings if the server requires them.

  1. Paste the MCP server URL from the provider into the Server URL field.
  2. Enter a connection name for xtquantai.
  3. Add a description and icon if you want it to be easier to identify.
  4. Add custom HTTP headers or OAuth client details if the server requires authentication.
3

Create the connection

Click Create connection, then return to the Plugins list and confirm the new MCP connection is active.

  1. Click Create connection.
  2. Return to the MCP connectors list.
  3. Confirm the xtquantai connection appears as active.
  4. Refresh the plugin list if the connection does not appear immediately.
4

Switch models without reconnecting

Start a chat with your preferred model, enable the xtquantai tools from Plugins, and switch to another model whenever needed. The MCP connection stays available to the TypingMind workspace.

  1. Start a new chat in TypingMind.
  2. Select the AI model you want to use.
  3. Enable the xtquantai tools from Plugins.
  4. Ask the model to use the tool when needed.
  5. Switch to another AI model and reuse the same MCP connection.
TypingMind chat using enabled MCP tools with a selected AI model
Can you use xtquantai to help me with this task?
xtquantai
Sure. I read it.
Here is what I found using xtquantai.

Frequently asked questions

What is the xtquantai MCP server used for?

xtquantai is an MCP server that lets compatible AI clients connect to external tools and context. In TypingMind, you can add this MCP server once and make its tools available in your AI workspace.

Can I use xtquantai MCP with multiple AI models in TypingMind?

Yes. TypingMind connects MCP tools at the workspace level, so you can use xtquantai with different AI models such as Claude, ChatGPT, Gemini, or other models you have configured in TypingMind without setting up the MCP server separately for each model.

Why use xtquantai MCP with TypingMind?

TypingMind is one of the best frontends for LLM chat because it brings multiple AI models, prompts, plugins, AI agents, API keys, and MCP tools into one workspace. With xtquantai connected, you can use its MCP tools across your preferred models while keeping your chat workflow organized in TypingMind.

How do I connect xtquantai MCP to TypingMind?

xtquantai can be connected in TypingMind with the local MCP connector or by adding a remote MCP server URL. Use the local connector when the server needs access to files, apps, or private resources on your device, and use a server URL when the MCP server is hosted remotely.

What tools does xtquantai MCP provide in TypingMind?

xtquantai exposes MCP capabilities that can be enabled from the TypingMind Plugins page and used in chat or assigned to AI agents.

Do I need to share my API keys with TypingMind to use xtquantai MCP?

No. TypingMind is local-first and lets you keep your model providers, API keys, prompts, and MCP configuration under your control. If xtquantai requires authentication, add the required headers, OAuth settings, or local configuration for that MCP server when you create the connection.

Related MCP Servers

View all

Set up your own AI workspace now

Get notified about new features and future giveaways by subscribing to our newsletter 👇