
Claude Mermaid MCP Server
MCP server for rendering Mermaid diagrams in Claude Code with live reload functionality and a built-in skill for expert guidance.
Automatically renders diagrams in your browser with real-time updates as you refine them. Perfect for iterative diagram development and documentation workflows.
✨ Features
- 🔄 Live Reload - Diagrams auto-refresh in your browser as you edit
- 🎨 Multiple Save Formats - Export to SVG, PNG, or PDF
- 🌈 Themes - Choose from default, forest, dark, or neutral themes
- 📐 Customizable - Control dimensions, scale, and background colors
- 🪄 Interactive Preview - Pan diagrams by dragging, zoom with browser controls, reset position with one click
- ⬇️ Browser Export - Download diagrams as SVG or PNG directly from the preview
- 🗂️ Multiple Previews - Use
preview_idto work on multiple diagrams simultaneously - 💾 Persistent Working Files - Live previews are stored under
~/.config/claude-mermaid/live - 🤖 Built-in Skill - Includes a Claude skill with best practices and expert guidance for creating diagrams
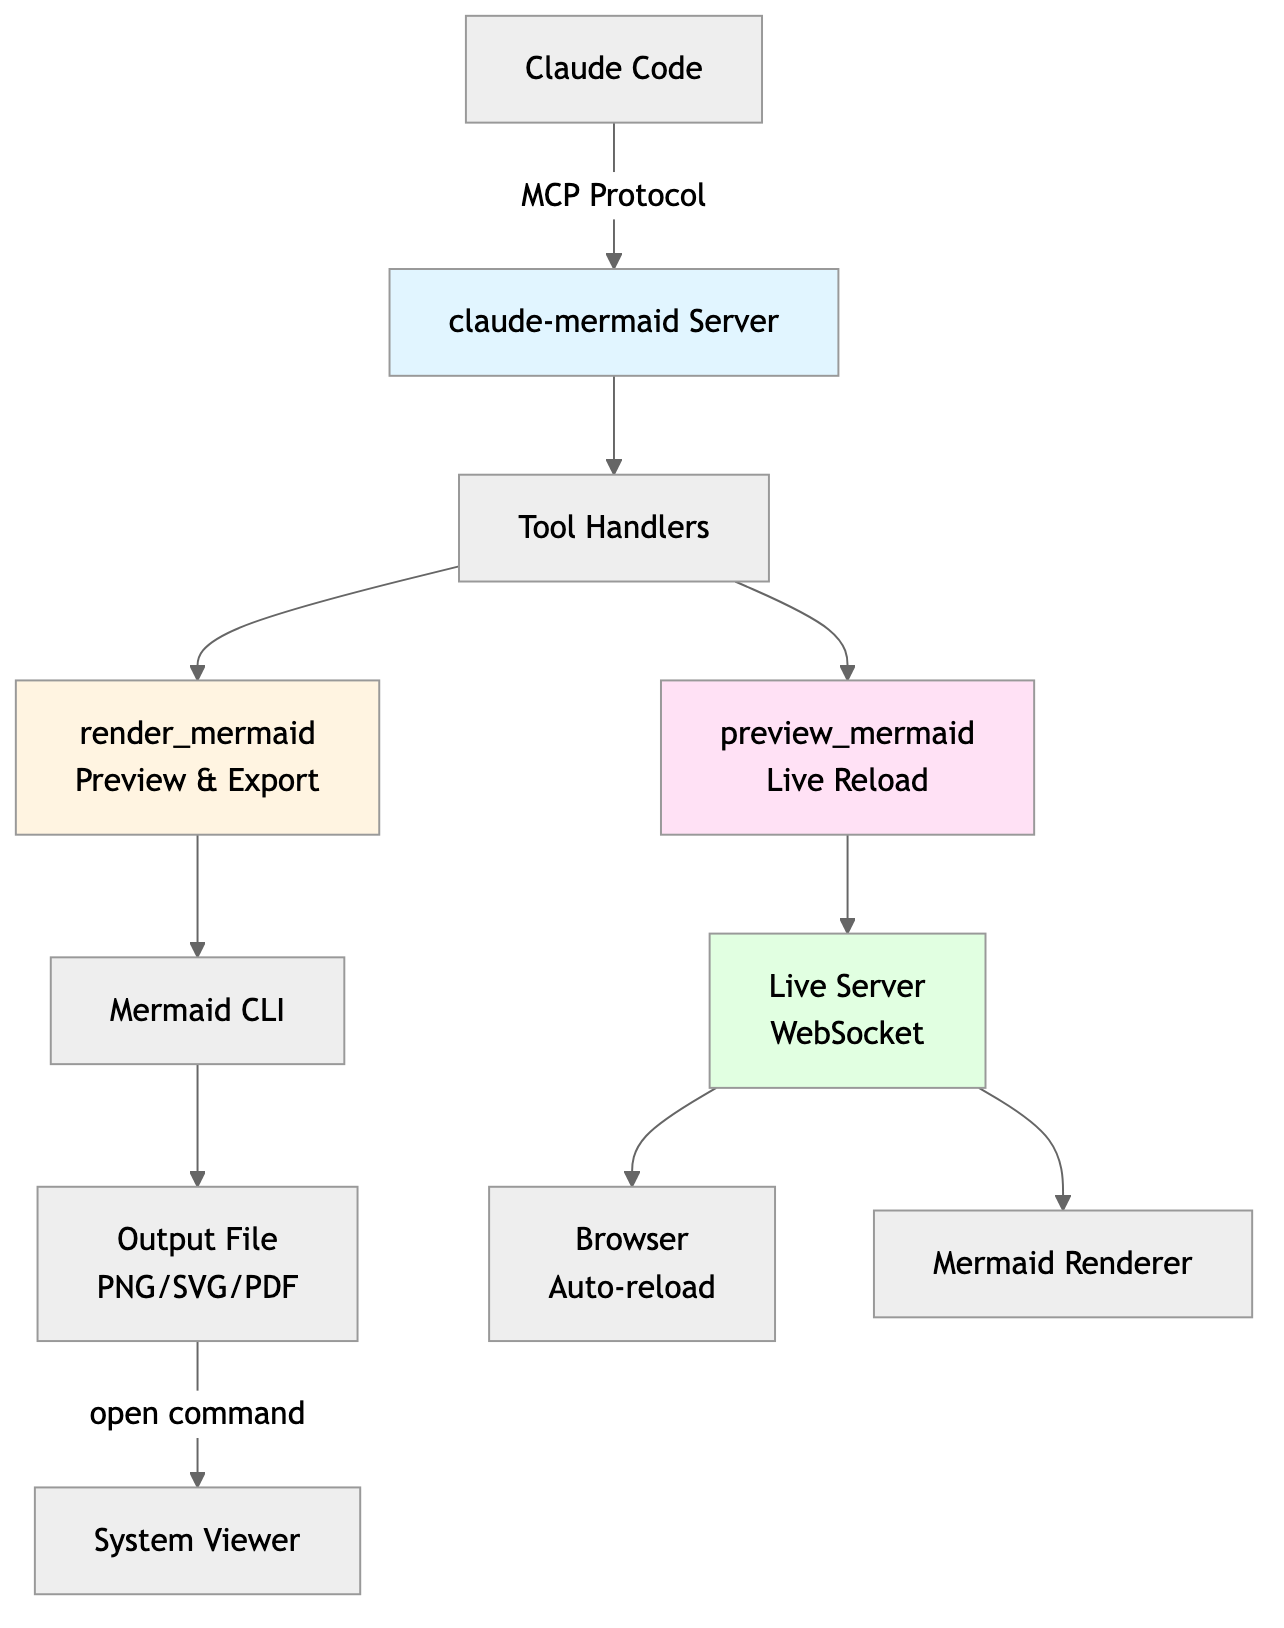
Architecture

🚀 Quick Start
1. Install
Plugin Install (Recommended)
In Claude Code, add the marketplace and install the plugin:
bash/plugin marketplace add veelenga/claude-mermaid /plugin install claude-mermaid@claude-mermaid
Then restart Claude Code to activate the plugin.
From npm:
bashnpm install -g claude-mermaid
From source:
bashgit clone https://github.com/veelenga/claude-mermaid.git cd claude-mermaid npm install && npm run build && npm install -g .
2. Verify Installation
Plugin install: The MCP server is configured automatically. Just verify:
bash/mcp
You should see mermaid in the MCP server list.
npm install: Configure the MCP server manually:
bashclaude mcp add --scope user mermaid claude-mermaid
Then verify:
bashclaude mcp list
You should see mermaid: claude-mermaid - ✓ Connected
🔌 Other MCP Client Configurations
While this server is optimized for Claude Code, it can work with any MCP-compatible client. Here's how to configure it for other popular tools:
Add to your Codex MCP settings file (~/.codex/mcp_settings.json):
json{ "mcpServers": { "mermaid": { "command": "claude-mermaid" } } }
Or configure via Codex CLI:
bashcodex mcp add mermaid claude-mermaid
Add to your Cursor MCP config file (.cursor/mcp.json or settings):
json{ "mcpServers": { "mermaid": { "command": "claude-mermaid" } } }
Or use Cursor's settings UI:
- Open Cursor Settings (Cmd/Ctrl + ,)
- Navigate to MCP Servers
- Add a new server with command:
claude-mermaid
If using the Cline extension for VSCode:
- Open VSCode settings (Cmd/Ctrl + ,)
- Search for "Cline MCP"
- Add to MCP Settings JSON:
json{ "mcpServers": { "mermaid": { "command": "claude-mermaid" } } }
Add to Windsurf's MCP configuration file:
json{ "mcpServers": { "mermaid": { "command": "claude-mermaid" } } }
Configuration location varies by platform:
- macOS:
~/Library/Application Support/Windsurf/mcp.json - Linux:
~/.config/windsurf/mcp.json - Windows:
%APPDATA%\Windsurf\mcp.json
Add to Gemini CLI's MCP configuration file (~/.gemini/mcp.json):
json{ "mcpServers": { "mermaid": { "command": "claude-mermaid" } } }
Or use the Gemini CLI to configure:
bashgemini config mcp add mermaid --command claude-mermaid
For any MCP-compatible client, use the standard configuration:
json{ "mcpServers": { "mermaid": { "command": "claude-mermaid" } } }
The command claude-mermaid should be available in your PATH after installation.
Note: Some clients may require the full path to the executable:
- Find the path:
which claude-mermaid(Unix/macOS) orwhere claude-mermaid(Windows) - Use absolute path in config:
"command": "/path/to/claude-mermaid"
💡 Usage
Simply ask Claude Code to create Mermaid diagrams naturally. When installed as a plugin, the built-in mermaid-diagrams skill provides expert guidance, best practices, and automatic workflow management.
Basic Examples
"Create a Mermaid diagram showing the user authentication flow" "Draw a sequence diagram for the payment process" "Generate a flowchart for the deployment pipeline"
Advanced Examples
With custom formatting:
"Create a dark theme architecture diagram with transparent background" "Generate a forest theme flowchart and save to ./docs/flow.svg"
With specific output format:
"Create an ER diagram and save as PDF to ./docs/schema.pdf" "Save the flowchart as PNG to ./docs/flow.png"
Note: Browser always shows SVG for live preview, while saving to your chosen format.
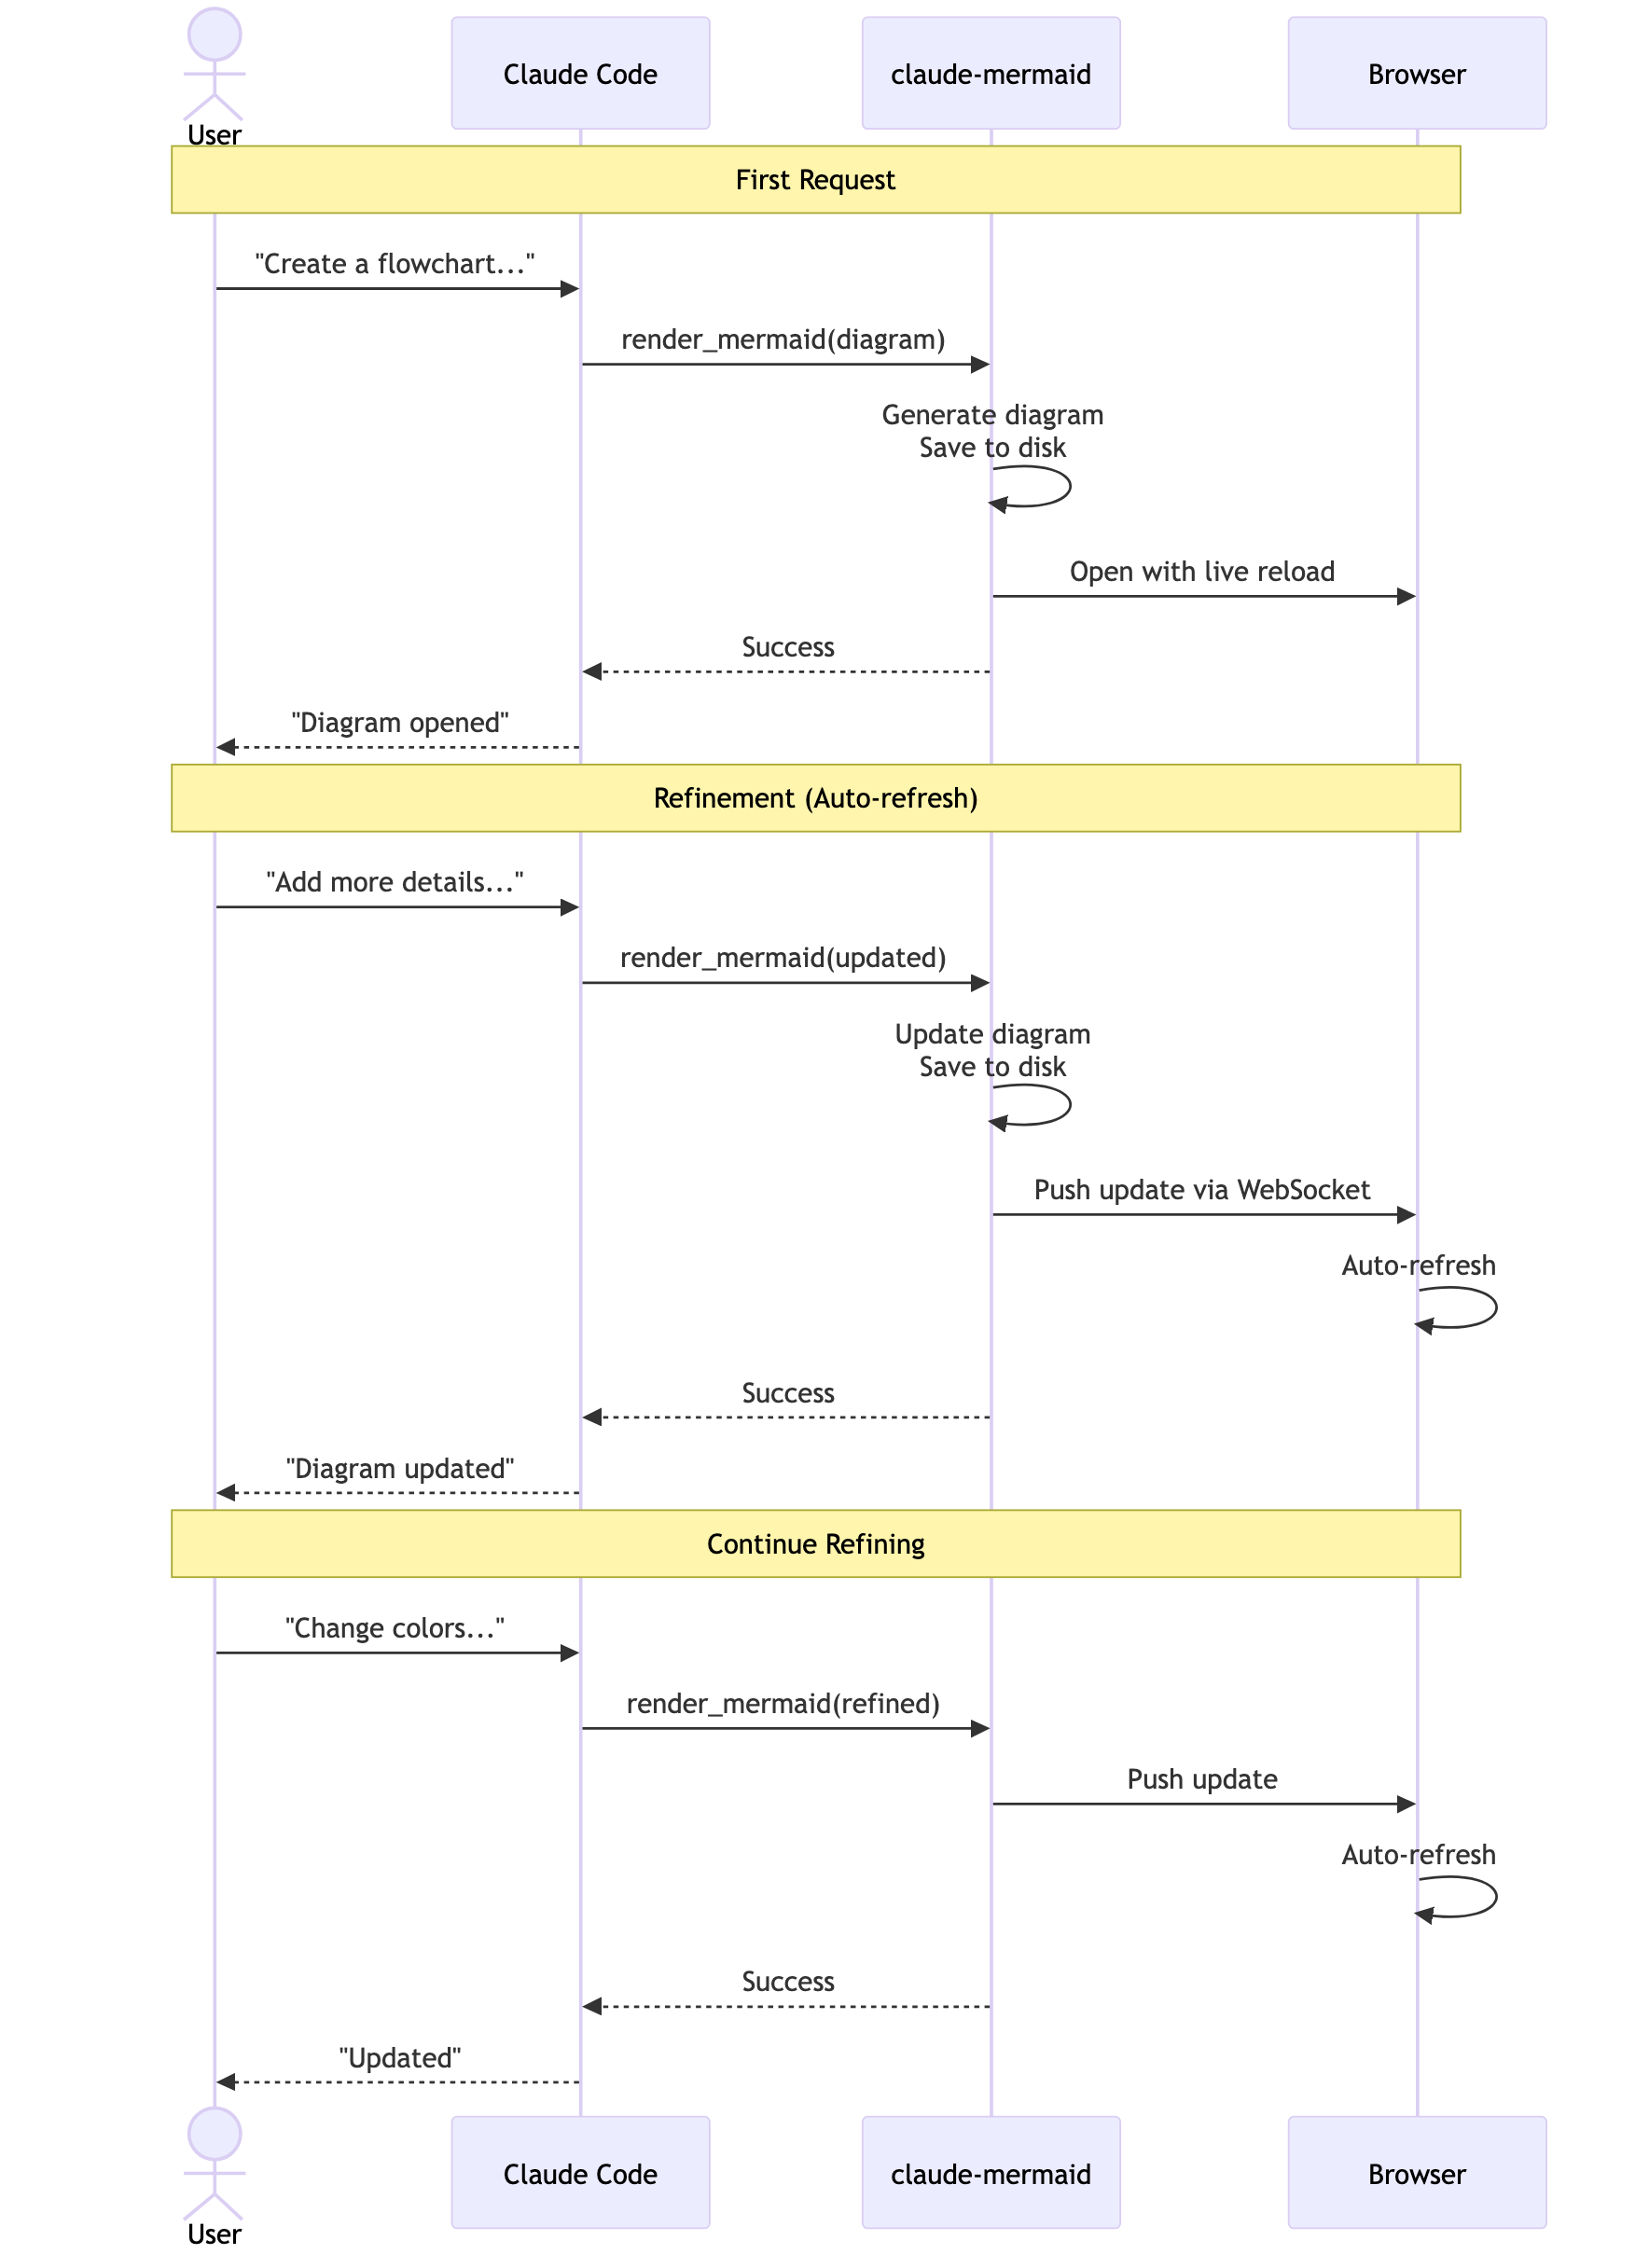
Iterative refinement:
"Create a class diagram for the User module" // Browser opens with live preview "Add the Address and Order classes with relationships" // Diagram updates automatically in browser!
Complete Example
"Create a flowchart and save to ./docs/auth-flow.svg: graph LR A[User Login] --> B{Valid Credentials?} B -->|Yes| C[Access Granted] B -->|No| D[Access Denied] C --> E[Dashboard] D --> F[Try Again] style A fill:#e1f5ff style C fill:#d4edda style D fill:#f8d7da "
The diagram will be saved to ./docs/auth-flow.svg and opened in your browser with live reload enabled.
🔧 Tools and Parameters
There are two tools exposed by the MCP server:
mermaid_preview— render and open a live preview
diagram(string, required) — Mermaid diagram codepreview_id(string, required) — Identifier for this preview session. Use different IDs for multiple concurrent diagrams (e.g.,architecture,flow).format(string, defaultsvg) — One ofsvg,png,pdf. Live preview is available only forsvg.theme(string, defaultdefault) — One ofdefault,forest,dark,neutral.background(string, defaultwhite) — Background color. Examples:transparent,white,#F0F0F0.width(number, default800) — Diagram width in pixels.height(number, default600) — Diagram height in pixels.scale(number, default2) — Scale factor for higher quality output.
mermaid_save— save the current live diagram to a path
save_path(string, required) — Destination path (e.g.,./docs/diagram.svg).preview_id(string, required) — Must match thepreview_idused inmermaid_preview.format(string, defaultsvg) — One ofsvg,png,pdf. If the live working file for this format doesn’t exist yet, it is rendered on demand before saving.
🎯 How Live Reload Works
- First render: Opens diagram in browser at
http://localhost:3737/{preview_id} - Make changes: Edit the diagram through Claude Code
- Auto-refresh: Browser detects changes via WebSocket and reloads
- Status indicator: Green dot = connected, Red dot = reconnecting
The live server uses ports 3737-3747 and automatically finds an available port.
Live Preview Controls
- Pan: Click and drag the diagram to move it around
- Zoom: Use browser zoom (Ctrl/Cmd + +/- or pinch-to-zoom on trackpad)
- Reset Position: Click the ⊙ button in the status bar to recenter the diagram
- Export: Click the ⬇ button to download as SVG or PNG
Notes
- Live preview is available for
svgformat only; PNG/PDF are rendered without live reload. - For sequence diagrams, Mermaid does not support
styledirectives insidesequenceDiagram.
🖥️ Standalone server
You can start the preview server without an AI agent using the --serve flag:
bashclaude-mermaid --serve
This opens the diagram gallery in your browser with all previously rendered diagrams. Useful for browsing and exporting diagrams outside of a Claude Code session.
🛠️ Development
bash# Install dependencies npm install # Build the project npm run build # Run tests npm test # Watch mode for development npm run dev # Start the MCP server directly npm start
📝 Troubleshooting
Error: Cannot find package 'puppeteer':
This is a rare environment-specific issue. Try these solutions:
-
Install claude-mermaid globally:
bashnpm install -g claude-mermaid -
Reinstall the plugin in Claude Code:
/plugin uninstall claude-mermaid /plugin install claude-mermaid@claude-mermaid
Server not connecting:
bash# Check if server is installed claude-mermaid -v # Reinstall if needed npm install -g claude-mermaid # Verify MCP configuration claude mcp list
Permission denied error:
bash# Make sure the binary is executable chmod +x $(which claude-mermaid)
Port already in use:
- The server uses ports 3737-3747
- It will automatically find an available port
- Check if another process is using these ports:
lsof -i :3737-3747
Diagrams not rendering or live reload not working:
The server logs to ~/.config/claude-mermaid/logs/:
mcp.log- Tool requests and diagram renderingweb.log- HTTP/WebSocket connections and live reload
Enable debug logging in your MCP config:
json{ "mcpServers": { "mermaid": { "command": "claude-mermaid", "env": { "CLAUDE_MERMAID_LOG_LEVEL": "DEBUG" } } } }
Then check the logs:
bash# View MCP operations tail -f ~/.config/claude-mermaid/logs/mcp.log # View WebSocket connections tail -f ~/.config/claude-mermaid/logs/web.log
Available log levels: DEBUG, INFO (default), WARN, ERROR, OFF
🤝 Contributing
Contributions are welcome! Please feel free to submit a Pull Request.
📄 License
MIT - see LICENSE file for details
🔗 Links
👀 See Also
If you like this project, you might also be interested in
- preview-skills — preview skills for visualizing files in the browser (markdown, csv, json, mermaid and more)
Hosted deployment
A hosted deployment is available on Fronteir AI.


